
HaHa:
0
-
 5 Ton A/C Condenser Repair & Upgrade
First off this unit is over 15 years old. We can't figure out if it is as old as 17 years or not. When I do a install I purge the refrigerant lines with Argon while soldering all connections. I have never met the installer that does. All are supposed to. Here's why, if you don't soot builds up on the inside of the lines at every silver solder joint. That soot damages the insulation windings of the compressor motor. Since the compressor motor relies on cold refrigerant as the compressor coolant it is always circulating in the system. I also install another Liquid Line Drier as well as a Suction Line Drier. I'm Marine HVAC trained. Residential installers don't do that either. First thing out of their mouth is the skid comes with a drier, Sad. Lazy in my book as all know the benefits of the redundant driers. Today most instructions are to remove the Suction Line Drier after running a couple of weeks but it hurts nothing to leave it in and there are instructions from the Drier manufacturers that its fine to leave it in. Well in my Marine training you leave them in. Any moisture remaining in the refrigerant lines after placing the skid into service turns into Acid. Well the Suction Line Driers trap acids that forms as I install Burn-Out Suction Line Driers only. Build in Acid protection. Lastly you will see a Sight Glass is installed, something else that installers today skip when installing a HVAC system. Did I say this unit is so old we can't remember how long ago it was put in service? Now down to the nuts of the failure, my laziness I can blame. Not that I always have 10 things to do here. I already bought all the parts, had them in a box to install last winter but didn't get to it. Had I done it then we wouldn't have had the failure yesterday which leads me to my last point - PM Preventive Maintenance in HVAC systems is important.


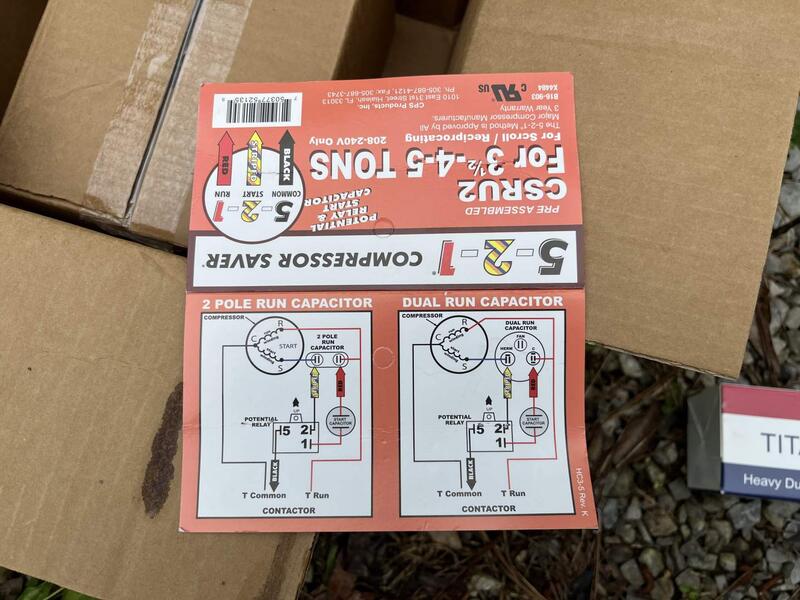
The first picture is a old type Hard Start Kit I install on my units. The Compressors are "Instant On" using these, no lag on startup. Second picture is the only contactor on the piece of equipment and the third the Capacitor to start the Compressor & Fan Motor.


I couldn't read the terminal labeling of the old Capacitor so it had to be cleaned up to confirm the wiring.


This is how I attack a HVAC Condenser Skid. If one part fails replace them all at the same time. The cost of a new contactor, capacitor, & Hard Start kit is nominal compared to risking a failed compressor because one of the other 2 parts fails later. This updated hart Start kit doesn't fry the compressor windings if you loose a leg. Everything is installed, and the terminations of all wiring is confirmed to be correct before moving on to the Condenser Fan Motor.


Years & years of vegetation and dirt built up in the bottom of the skid. I cleaned all the deposits out then washed the bottom pan before moving on.


Never try to remove the Fan Blade before cleaning the motor shaft of all rust. It doesn't work out. Always use some sandpaper first to clean the shaft very well before trying to remove the fan blade.

After cleaning the shaft first a few raps with my plastic hammer and the blade practically falls off.


New motor is installed and the Fan Blade spaced the same distance off the motor face.


The wires are tied up so no rubbing and the top is reinstalled on the Cabinet. Ready to put back in service for testing.

I always take a picture of the wiring diagram so I can blow up what I need to see to confirm again the correct wiring before powering up. We have A/C again, yeah.
Tags for this Thread
 Posting Permissions
- You may not post new threads
- You may not post replies
- You may not post attachments
- You may not edit your posts
-
Forum Rules
BACK TO TOP

 Likes:
  Thanks:


 Reply With Quote


